
You are using an out of date browser. It may not display this or other websites correctly.
You should upgrade or use an alternative browser.
You should upgrade or use an alternative browser.
Sy #2875 Build :eh:
- Thread starter Maple Syrup
- Start date
92TYPHOON937
Active member
Re: Sy #2875 Build :eh:
wow lots of good work there
wow lots of good work there
Sean Krupa
Moderator
Re: Sy #2875 Build :eh:
Great job!! What coilovers are those in the front? Would match my engine bay perfectly lol.
Great job!! What coilovers are those in the front? Would match my engine bay perfectly lol.
Maple Syrup
Canadian Bacon Breath
Re: Sy #2875 Build :eh:
Got some more done on the truck....
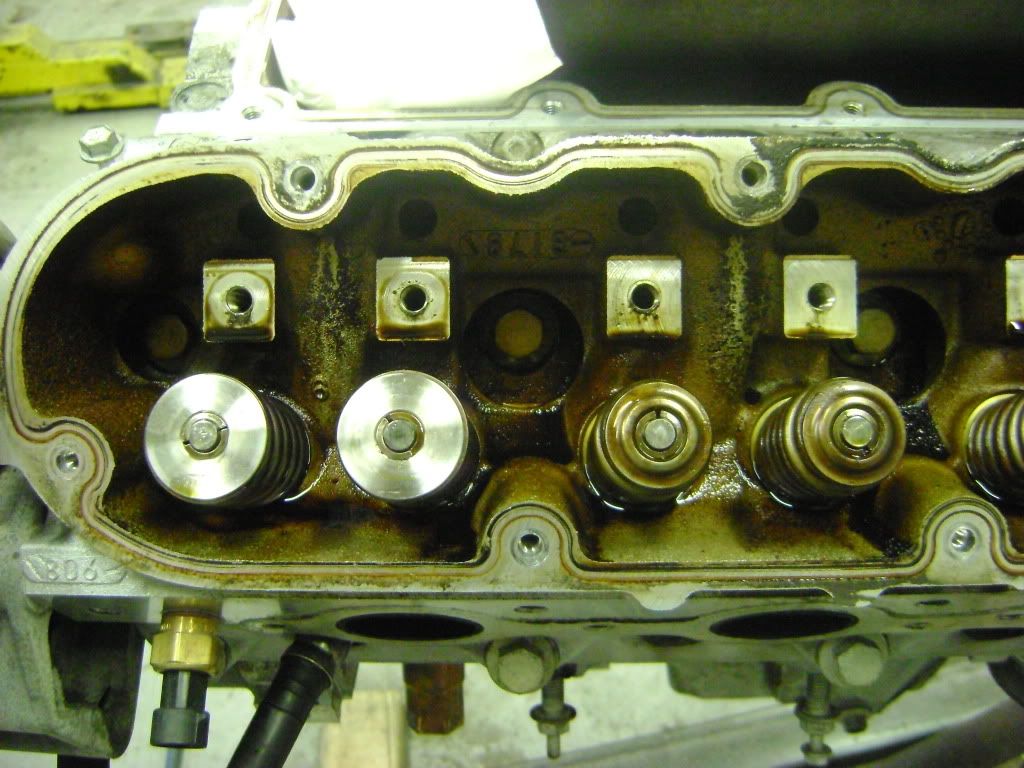
Took the factory pushrods out, then I pulled out the factory LS1 cam
Decided to first install my dual valve spring kit from Texas Speed and Performance. I've rebuilt a few motors in the past but im no specialist. What may have been a quick job for some wasn't the case for me. I took my time and made sure everything was done properly and tourqed down to the right specs.
Showing the Stock LS1 valve springs (right) after installing the first two new valve springs (left).

After the first few, I started to get the hang of it and before i knew it i was finished!


Next I turned the motor over, pulled the pan ect off and removed the factory lifters and installed my new LS7 lifters.

Then I installed my new TSP camshaft.
Classic "for reference" picture...
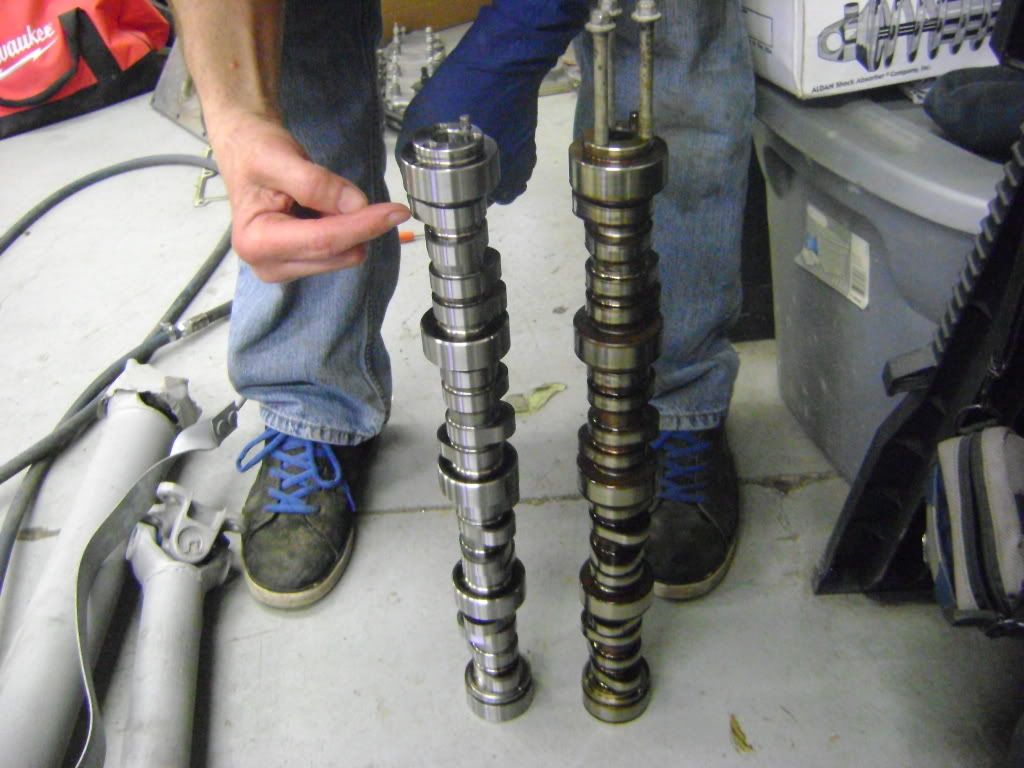
and in its new home! :lol:

Then installed my new LS2 timing gear, LS2 timing chain, new GM waterpump.
Then my new Milodon windage tray and oil pickup got installed.


Reinstalled the factory timing chain cover and installed my new Milodon oil pan. I'll have some more pictures of the motor hopefully after I finish it up this weekend.
Took a break from the mechanical. I like to hope around to different aspects of the project, helps to keep me motivated!
worked a few nights, sanded my fenders (in and out) for primer. Blockede the outside with 120 gritt to make sure they were straight. There were a few dents and dings but nothing major.
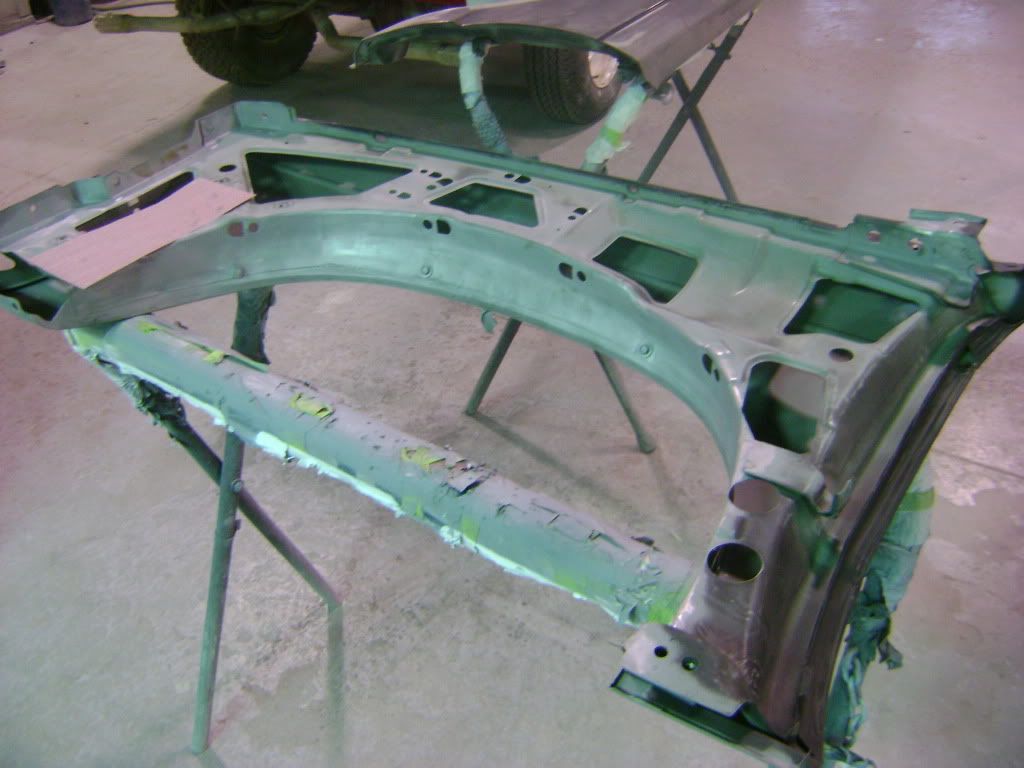
Primed the insides for now.


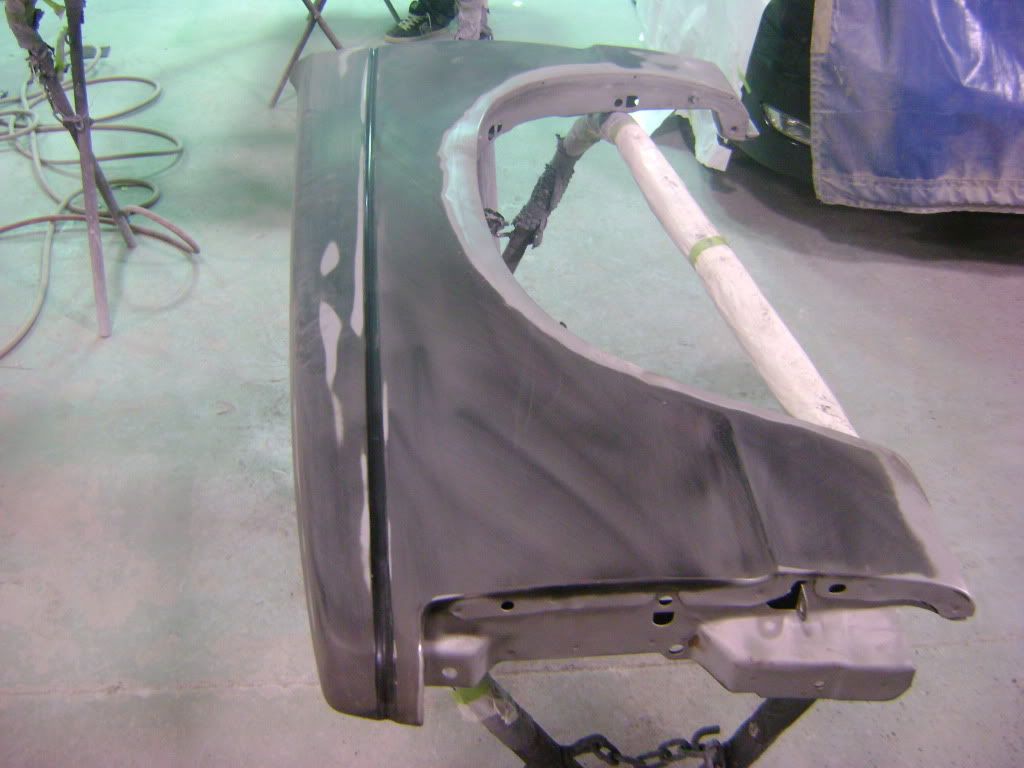
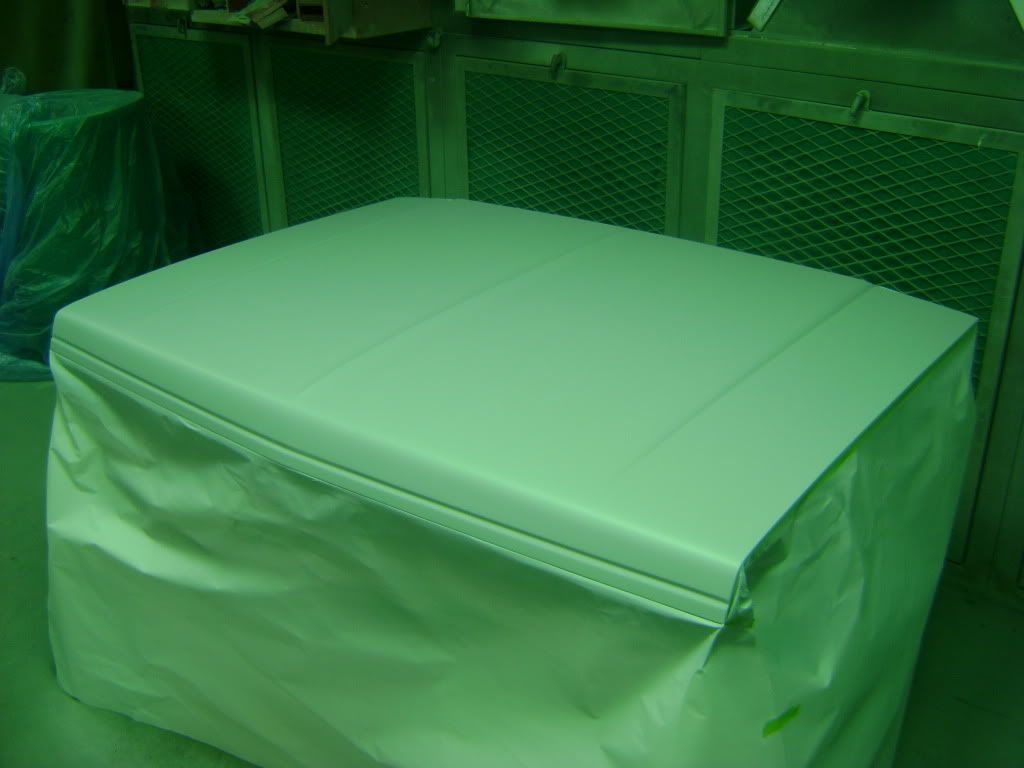
Even though I had said previously that I wasn't going to get fussy with my hood ( wasn't planning on keeping it long term). I blocked it out and wasnt happy with the result. So I layed another couple of coats on it after some body work and hopefully after some more blocking it will be great! planning on keeping the stock hood now. After rethinking my goals with the truck, I decided the stock hood will totally suit the look im going for.
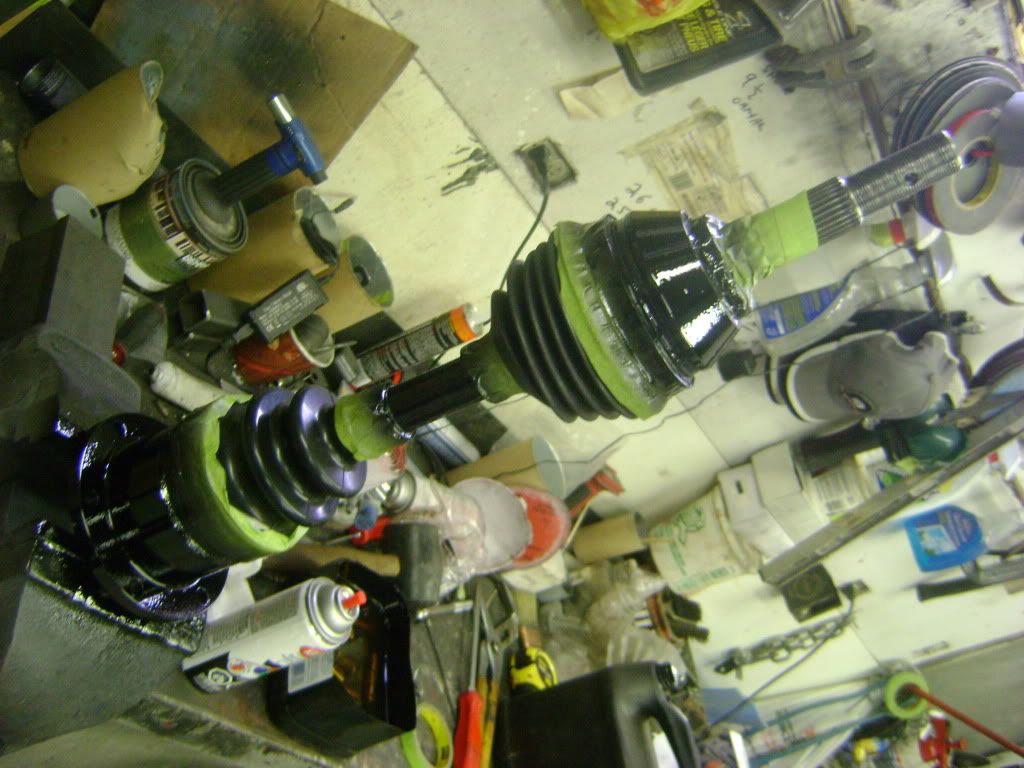
sanded, primed and painted some more parts after work a few nights. as well as changing the drivers side outter front axle boot (was torn).

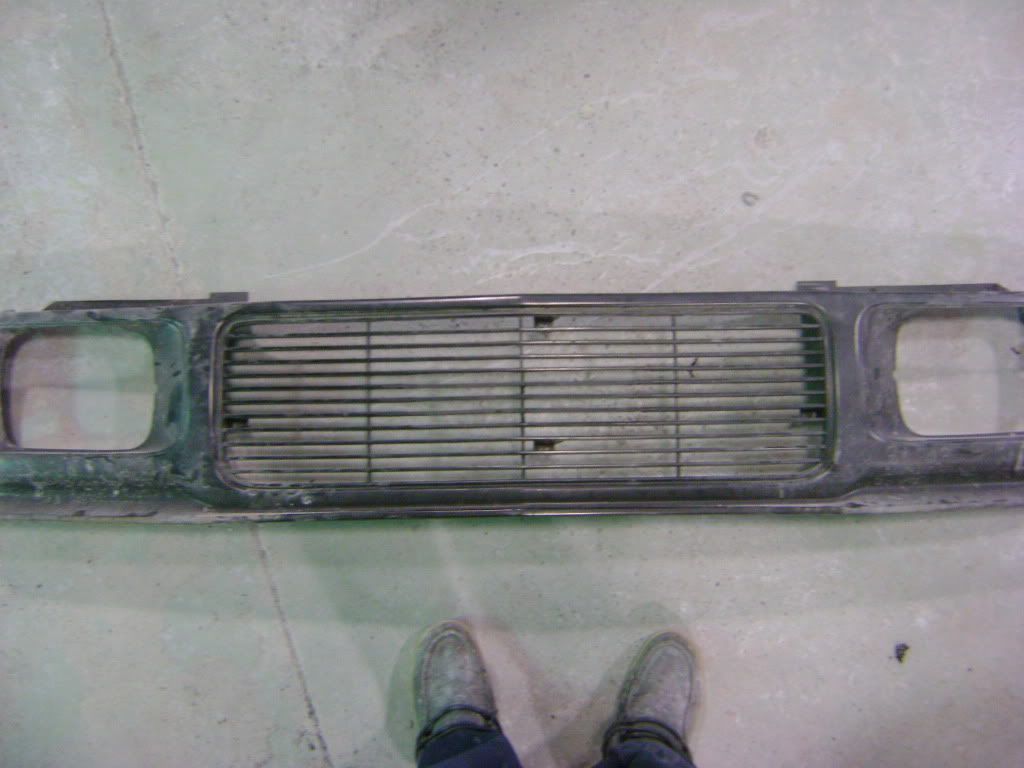
Also started my OEM+ grill mod that i've been wanting to do for quite a long time now!
factory shot...
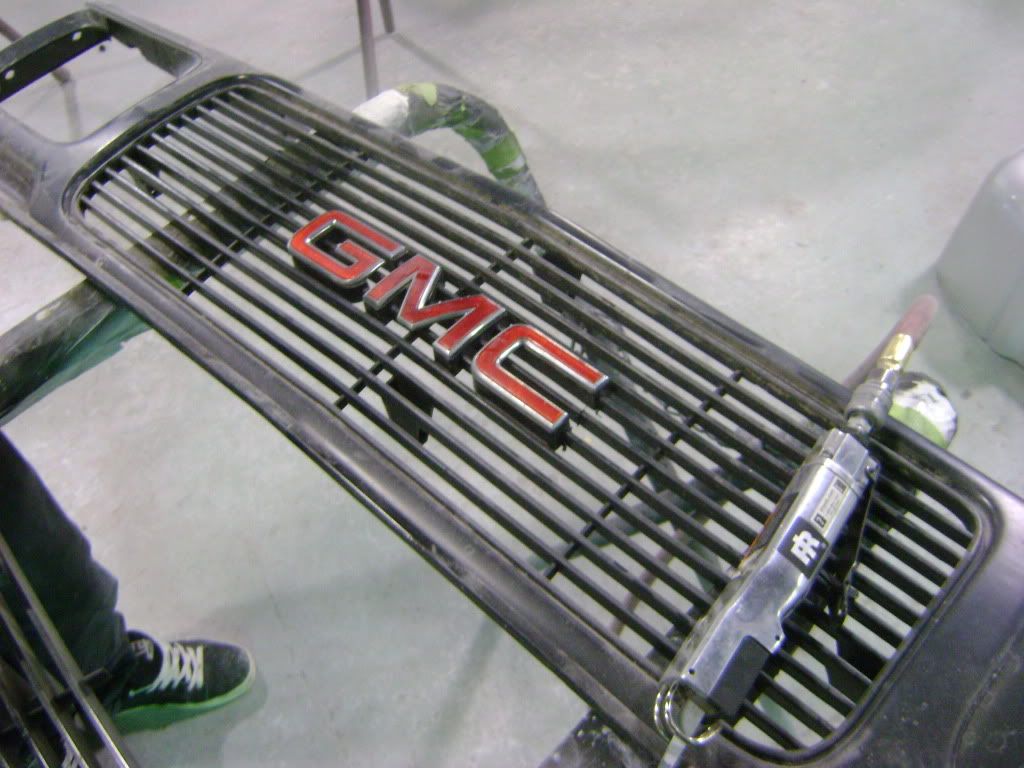
cut out the three bars which hold the "GMC" emblem. Used the grill insert cutout that I aquired to cut a matching factory three bars to replace the emblem logo and make the grill smooth and seamless. Alot of work for somthing so simple but I love the little details.
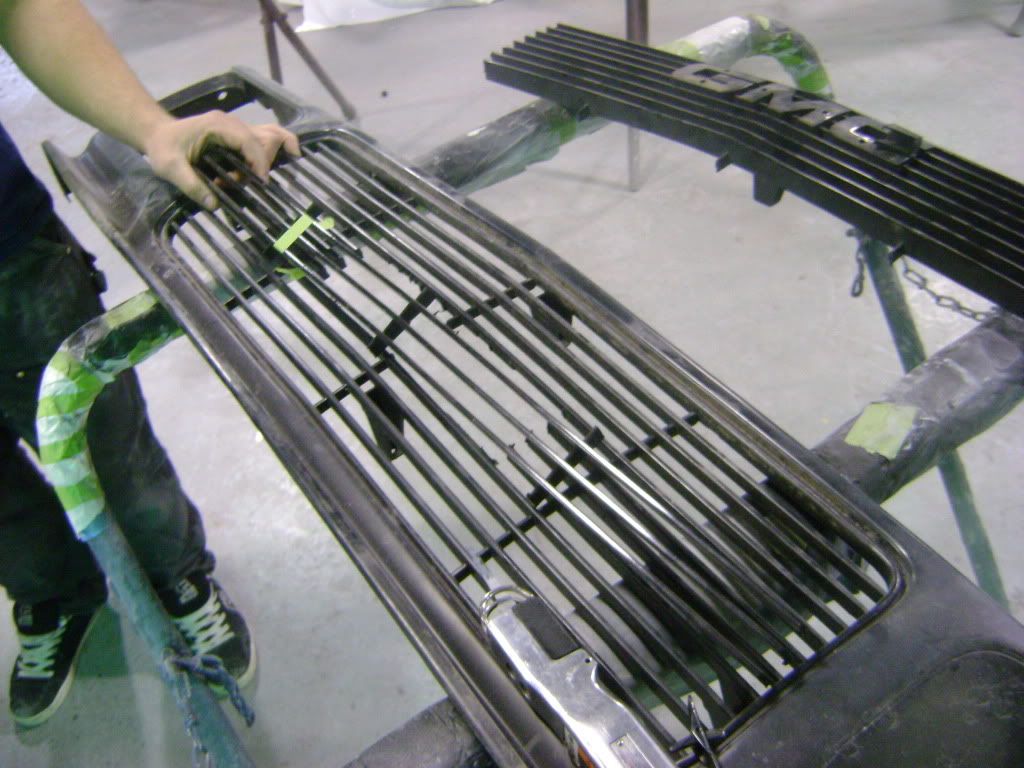
after cutting, trimming and fitting I got it set in place, melted the ends of the new bars to the existing attaching bars of the grill and made it one. It is perfect yet, the work it still rough but its a start.


after some more grinding....

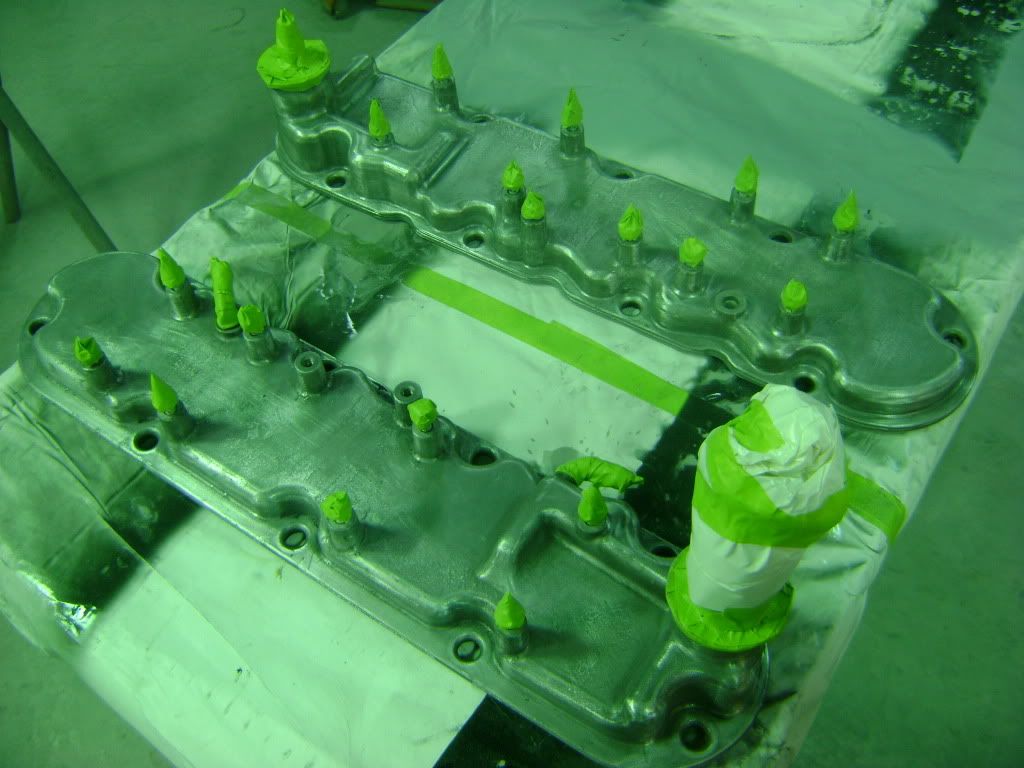
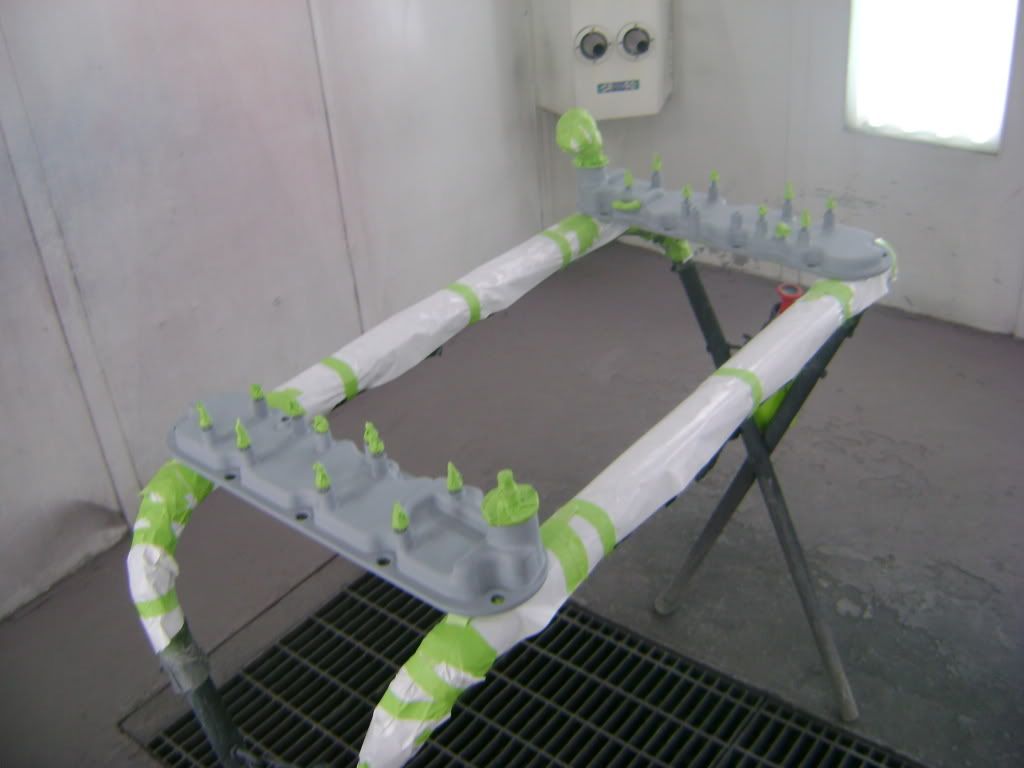
Sanded my valve covers and taped them up for primer and primed them....

Got my stainless line kit from Sportmachines!! god is it ever nice and after quickly comparing it to my factory lines, the bends and fitment is great! cant wait to get them on!


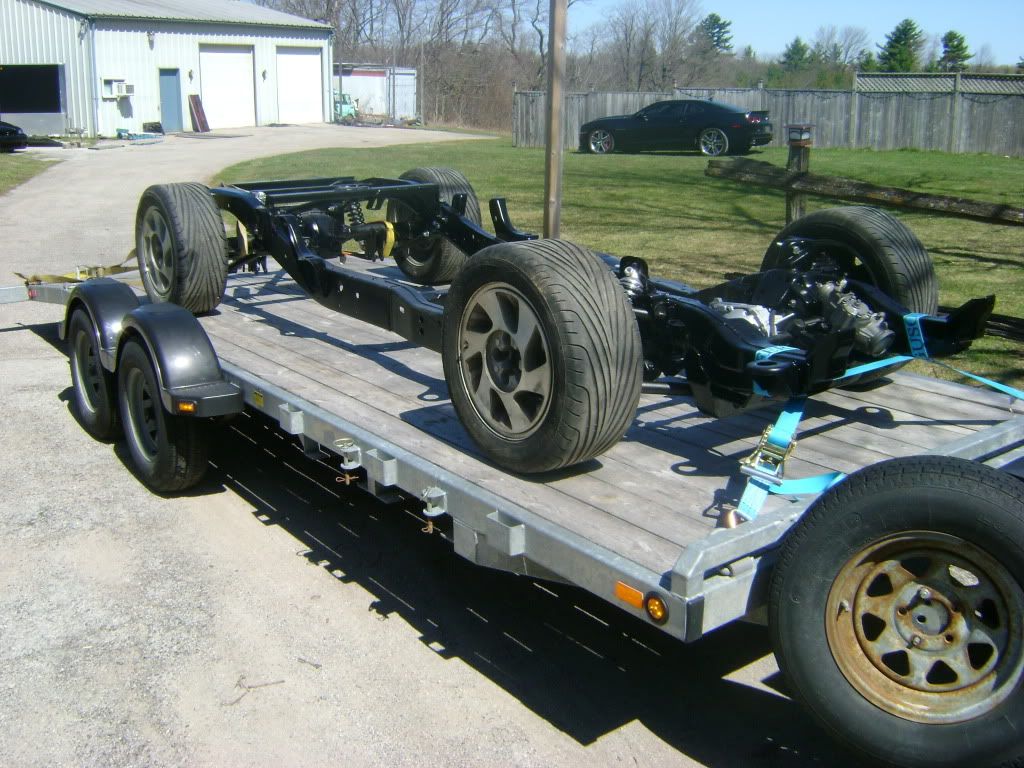
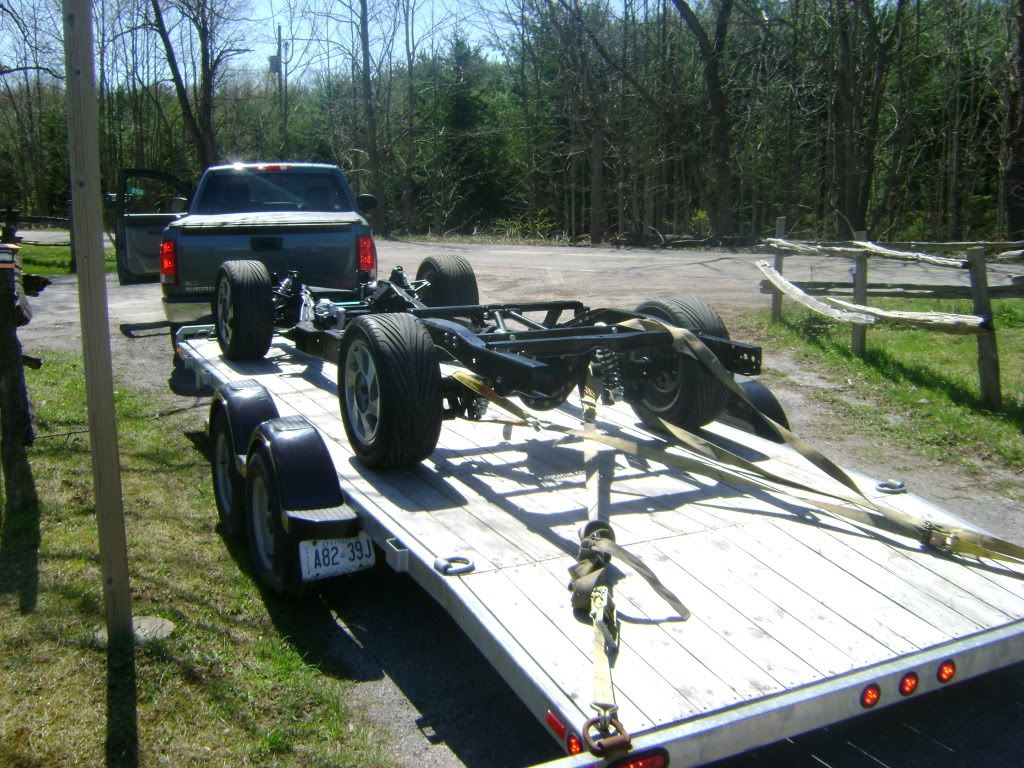
And finally... rolled the frame out of the garage for the first time to put it on the trailor, my father and i took it to work to pick up the bed for the truck and bring it home!
Thats all for now, stay tuned.
Got some more done on the truck....
Took the factory pushrods out, then I pulled out the factory LS1 cam
Decided to first install my dual valve spring kit from Texas Speed and Performance. I've rebuilt a few motors in the past but im no specialist. What may have been a quick job for some wasn't the case for me. I took my time and made sure everything was done properly and tourqed down to the right specs.
Showing the Stock LS1 valve springs (right) after installing the first two new valve springs (left).
After the first few, I started to get the hang of it and before i knew it i was finished!
Next I turned the motor over, pulled the pan ect off and removed the factory lifters and installed my new LS7 lifters.
Then I installed my new TSP camshaft.
Classic "for reference" picture...
and in its new home! :lol:
Then installed my new LS2 timing gear, LS2 timing chain, new GM waterpump.
Then my new Milodon windage tray and oil pickup got installed.
Reinstalled the factory timing chain cover and installed my new Milodon oil pan. I'll have some more pictures of the motor hopefully after I finish it up this weekend.
Took a break from the mechanical. I like to hope around to different aspects of the project, helps to keep me motivated!
worked a few nights, sanded my fenders (in and out) for primer. Blockede the outside with 120 gritt to make sure they were straight. There were a few dents and dings but nothing major.
Primed the insides for now.
Even though I had said previously that I wasn't going to get fussy with my hood ( wasn't planning on keeping it long term). I blocked it out and wasnt happy with the result. So I layed another couple of coats on it after some body work and hopefully after some more blocking it will be great! planning on keeping the stock hood now. After rethinking my goals with the truck, I decided the stock hood will totally suit the look im going for.
sanded, primed and painted some more parts after work a few nights. as well as changing the drivers side outter front axle boot (was torn).
Also started my OEM+ grill mod that i've been wanting to do for quite a long time now!
factory shot...
cut out the three bars which hold the "GMC" emblem. Used the grill insert cutout that I aquired to cut a matching factory three bars to replace the emblem logo and make the grill smooth and seamless. Alot of work for somthing so simple but I love the little details.
after cutting, trimming and fitting I got it set in place, melted the ends of the new bars to the existing attaching bars of the grill and made it one. It is perfect yet, the work it still rough but its a start.
after some more grinding....
Sanded my valve covers and taped them up for primer and primed them....
Got my stainless line kit from Sportmachines!! god is it ever nice and after quickly comparing it to my factory lines, the bends and fitment is great! cant wait to get them on!
And finally... rolled the frame out of the garage for the first time to put it on the trailor, my father and i took it to work to pick up the bed for the truck and bring it home!
Thats all for now, stay tuned.
gstacky
Member
Re: Sy #2875 Build :eh:
Love the grille mod, that is awesome work, I went with one of the billet inserts, works for my S10 with some other chrome accents, but wouldn't work on a Sy, but yours will look perfect, keep up the good work. And bring one of your trucks down to the Ontario meet, it would be great to see you there.
Love the grille mod, that is awesome work, I went with one of the billet inserts, works for my S10 with some other chrome accents, but wouldn't work on a Sy, but yours will look perfect, keep up the good work. And bring one of your trucks down to the Ontario meet, it would be great to see you there.
SYO237
SyTy Registry
Re: Sy #2875 Build :eh:
That 4 link, :rock::drool:
Tyler, is the kit that you bought?
http://www.kplinks.com/product.php?productid=146&cat=48&page=1
That 4 link, :rock::drool:
Tyler, is the kit that you bought?
http://www.kplinks.com/product.php?productid=146&cat=48&page=1
DanenGraham
Big in the rear
Re: Sy #2875 Build :eh:
Looks like the GMC emblems are in good shape.
Want to sell them?
Looks like the GMC emblems are in good shape.
Want to sell them?
DanenGraham
Big in the rear
Re: Sy #2875 Build :eh:
Should be
That 4 link, :rock::drool:
Tyler, is the kit that you bought?
http://www.kplinks.com/product.php?productid=146&cat=48&page=1
Should be
Decided to go with the KP Components bolt on 4-Link
alwayscode390
pppssssshhhhhtttttttttttt
Re: Sy #2875 Build :eh:
You really brought this truck back to life ... I cant wait to see what turbo you choose to go with") ---
---
You really brought this truck back to life ... I cant wait to see what turbo you choose to go with
---Sportmachines
Active member
Re: Sy #2875 Build :eh:
That's not the KP set up. It's a different one. Tyler can comment on which one it is.
That's not the KP set up. It's a different one. Tyler can comment on which one it is.
DanenGraham
Big in the rear
Re: Sy #2875 Build :eh:
Custom Connection, name is on the bracket. Would like to hear why he went with one over the other. CC on is a little more coin, but not much.
Unless, he is saying he got one, then posting pics of another, and then changed it again. It should be the CC bolt on 4link...
That's not the KP set up. It's a different one. Tyler can comment on which one it is.
Custom Connection, name is on the bracket. Would like to hear why he went with one over the other. CC on is a little more coin, but not much.
Unless, he is saying he got one, then posting pics of another, and then changed it again. It should be the CC bolt on 4link...
Maple Syrup
Canadian Bacon Breath
Re: Sy #2875 Build :eh:
Thanks! and it's only going to get better :tup:
Thanks for the kind words, I work about 6 days a week but ill try my best to bring the Sy with me this year if i can make it as the lophonie is going under the knife again!
No, that isnt the kit I bought.
The letters are in very nice shape indeed, ill be returning your pm tonight!
Sadly it will be n/a for this summer anyways. I have something different in the works for the motor down the road. Having not completed my research and thoughts ill keep it hush hush for now. As for keeping it n/a (im sure alot of sy/ty er's will hate on it), it was a budget decision for me as I just got out of school not to long ago and have some rather large expences coming up in the future. This is the reason for doing a cam ect ect...hopefully it will keep me happy until I can build the drivetrain how I want down the road when hopefully my wallet allows.
It is a different setup, you'll have to excuise that stupid post, I was probably tired from work and not thinking!
It is infact the Custom Connections Bolt on 4-link. I'm the type of guy to research the life out of any idea, mod or product before purchasing it. This case was no different, after tons of research I decided to go with the CC 4-link for a number of reasons:
It was a little more expensive than some of the others on the market, but I felt that a 4-link was somthing that I couldnt cheap out on (tiny bars/hardware, positioning, welds, materials. bushings ect). I also liked the fact that there was the 2 link bars from the corssmember to the rear-end looking like a wishbone type set up as opposed to a single panhard bar which other kits I looked at had. The rear end pot surround, link bars was very heavy duty and over kill in person, Again the fact that the whole kit was very overkill was appealing because I plan on driving, auto crossing, and pushing this truck very hard every day!
I dont want to blad on too too much, but After looking at a number of different kits, deciding how i woukld change them to suit my needs and wants as well as pricing and measuring out my out pieces to build my own kit this was the best hassle free way I felt i could do it.
If anyone is going to attend Homecoming this year or feels like pm'ing me more about it for extra pictures of anything ill be happy to talk about it more.
Thanks, im trying to stay focused! I'm not planning on it. Dealing with this right now as a matter of fact. the rear drums may be used until I find a alternative as rear dics arn't super important right now.
nice work!! i love the rear coil over set up...:tup:
Thanks! and it's only going to get better :tup:
Love the grille mod, that is awesome work, I went with one of the billet inserts, works for my S10 with some other chrome accents, but wouldn't work on a Sy, but yours will look perfect, keep up the good work. And bring one of your trucks down to the Ontario meet, it would be great to see you there.
Thanks for the kind words, I work about 6 days a week but ill try my best to bring the Sy with me this year if i can make it as the lophonie is going under the knife again!
That 4 link, :rock::drool:
Tyler, is the kit that you bought?
http://www.kplinks.com/product.php?productid=146&cat=48&page=1
No, that isnt the kit I bought.
Looks like the GMC emblems are in good shape.
Want to sell them?
The letters are in very nice shape indeed, ill be returning your pm tonight!
You really brought this truck back to life ... I cant wait to see what turbo you choose to go with
Sadly it will be n/a for this summer anyways. I have something different in the works for the motor down the road. Having not completed my research and thoughts ill keep it hush hush for now. As for keeping it n/a (im sure alot of sy/ty er's will hate on it), it was a budget decision for me as I just got out of school not to long ago and have some rather large expences coming up in the future. This is the reason for doing a cam ect ect...hopefully it will keep me happy until I can build the drivetrain how I want down the road when hopefully my wallet allows.
That's not the KP set up. It's a different one. Tyler can comment on which one it is.
It is a different setup, you'll have to excuise that stupid post, I was probably tired from work and not thinking!
Custom Connection, name is on the bracket. Would like to hear why he went with one over the other. CC on is a little more coin, but not much.
Unless, he is saying he got one, then posting pics of another, and then changed it again. It should be the CC bolt on 4link...
It is infact the Custom Connections Bolt on 4-link. I'm the type of guy to research the life out of any idea, mod or product before purchasing it. This case was no different, after tons of research I decided to go with the CC 4-link for a number of reasons:
It was a little more expensive than some of the others on the market, but I felt that a 4-link was somthing that I couldnt cheap out on (tiny bars/hardware, positioning, welds, materials. bushings ect). I also liked the fact that there was the 2 link bars from the corssmember to the rear-end looking like a wishbone type set up as opposed to a single panhard bar which other kits I looked at had. The rear end pot surround, link bars was very heavy duty and over kill in person, Again the fact that the whole kit was very overkill was appealing because I plan on driving, auto crossing, and pushing this truck very hard every day!
I dont want to blad on too too much, but After looking at a number of different kits, deciding how i woukld change them to suit my needs and wants as well as pricing and measuring out my out pieces to build my own kit this was the best hassle free way I felt i could do it.
If anyone is going to attend Homecoming this year or feels like pm'ing me more about it for extra pictures of anything ill be happy to talk about it more.
Wow that's alotta progress since I last checked this thread. Are you planning to keep the rear drum brakes?
Thanks, im trying to stay focused! I'm not planning on it. Dealing with this right now as a matter of fact. the rear drums may be used until I find a alternative as rear dics arn't super important right now.
Maple Syrup
Canadian Bacon Breath
Re: Sy #2875 Build :eh:
Here's another update guys! got some more done in the last few days!
So I got my valve covers and fuel rail sanded

cleaned, taped and set them up in the booth for paint!


Mixed of my paint, (base left, pearl right) named the base peach cobbler haha, its
just what came to mind. and pearl coat 24K

After 2 coats of base

After 3 coats of pearl

And finally 2 coats of clear :lol:

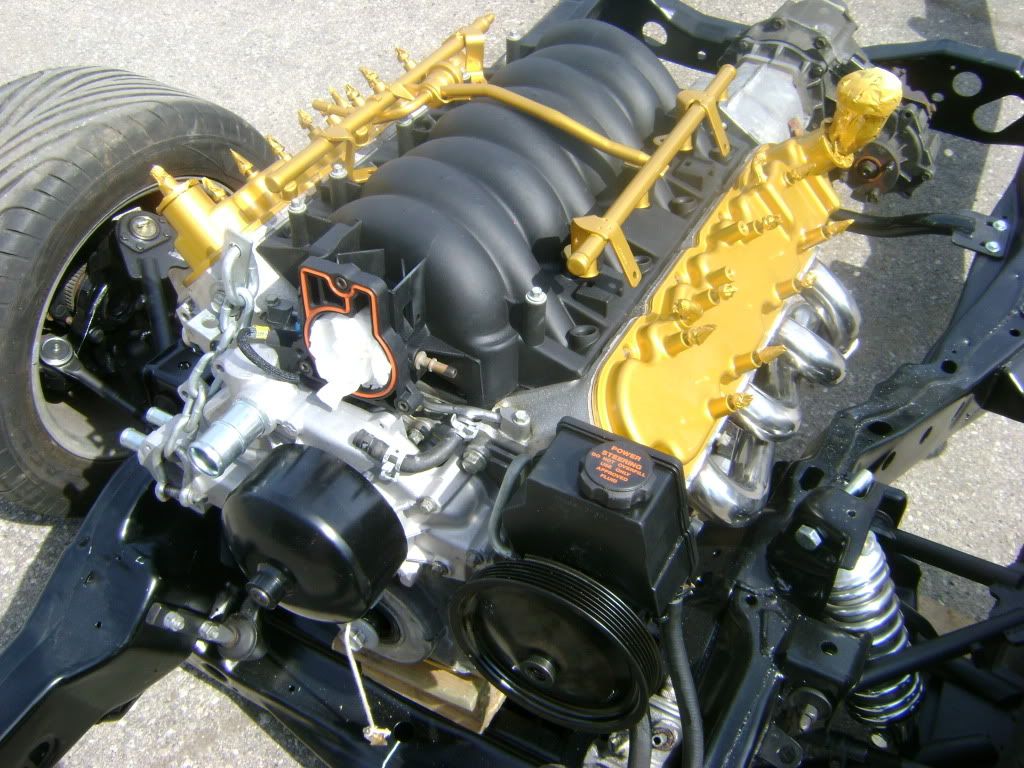
Also got my tabs for my motor mounts, I'll be using a factory GM LS1 mount that bolts to the motor and ill be making a solid type mount that bolts to the frame.


I had been looking for a LS6 intake for the truck but decided I can add that later if need be. In the mean time though the factory LS1 intake had this emission hole in it behind the throttle body, I found out the LS1 C5 corvette intakes didnt have this hole, However otherwise were the same. So I scored one of these locally and picked it up!
Factory Camaro LS1:

New (Factory) Corvette LS1:

And installed!

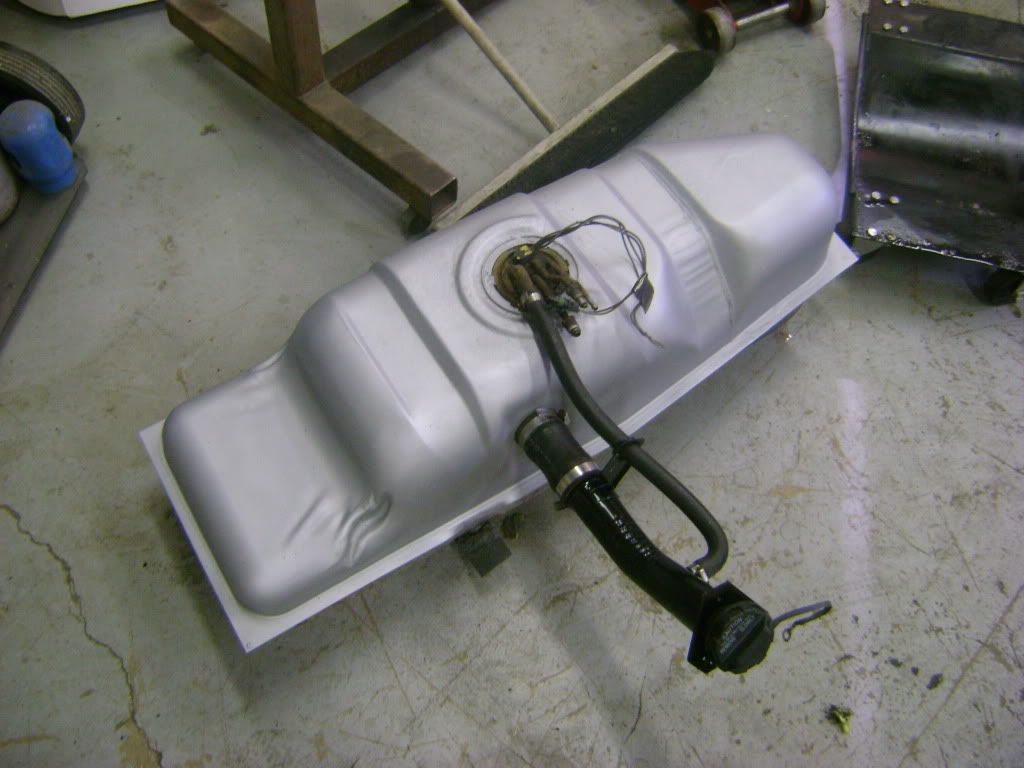
Then I started to clean the gas tank ect for re-installation. Threw in a Walboro pump to!
Took the hoses off, sending unit out, cleaned it sanded it, primed it and painted it!


Back together!
In between drying time with the gas tank I got busy seperating the factory 700R4 and transfer case as well as seperating the 4L80E and attached transfer case. I made quite the mess!


Installed some of my Prime Gears 4L80E kit since I was working on mocking up everything! Some parts werent installed as everything obviously had to come back apart so I can send the trans to get built!
Got the 4L80E and transfer case together and dropped it in with my 4L80E tubular crossmember.


Then the motor came off the engine stand and made its way in there as well!

My Father trying to put my drivers side headers on, but of course ran into the start of the problems as we knew we would.

So we had to cut this un-used bracket off of the trans.

Got the header on, set the motor where it neede to be and snugged up the mounting points so that we could roll the frame outside and bring the cab inside to put on the hoist to lower it back down on to the frame!
I guess i'll break the news now...the truck is going one of my favorite colors 2005 Subaru STI Aspen White.

Decided to put set my valve covers and fuel rail on since I had picked them up the following sunday after painting them and i wanted to see the pearl in the light!! So on they went....


Rolled the rolling chassis back in after putting the cab back on to the hoist, started lowering it down...
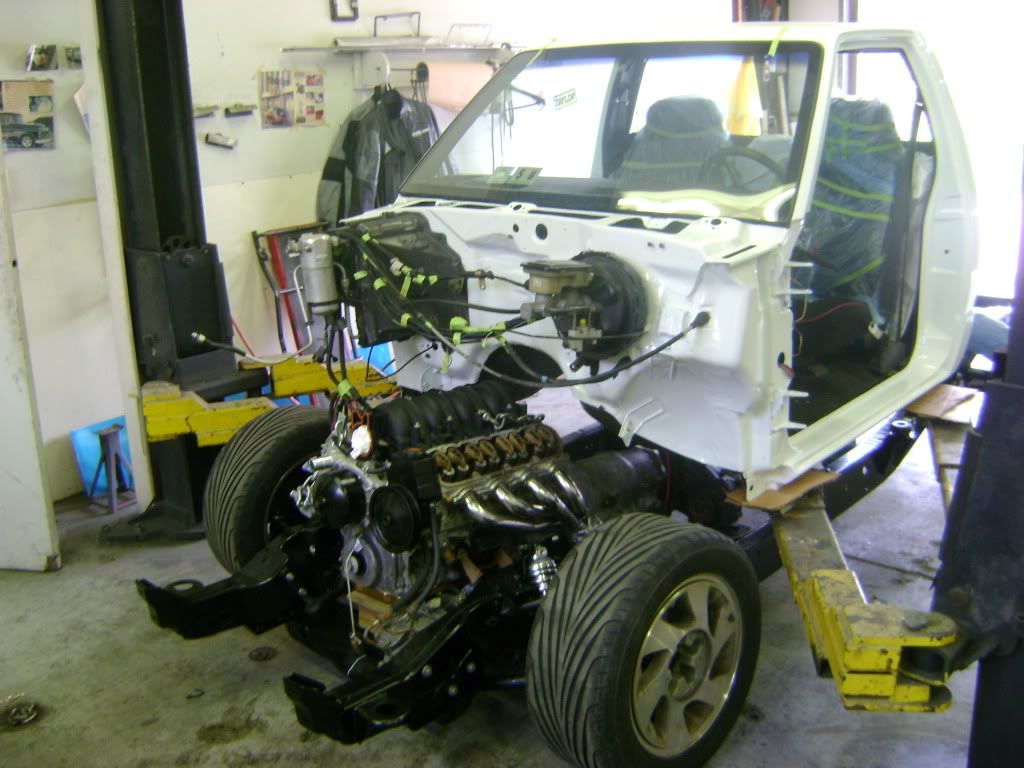
ran in to a few problems with fitment, did quite a bit of moving around and adjusting...still have tons of fitting to do ect but its getting there...
Got a few new parts for the build that came in this week too!! it was like christmas!
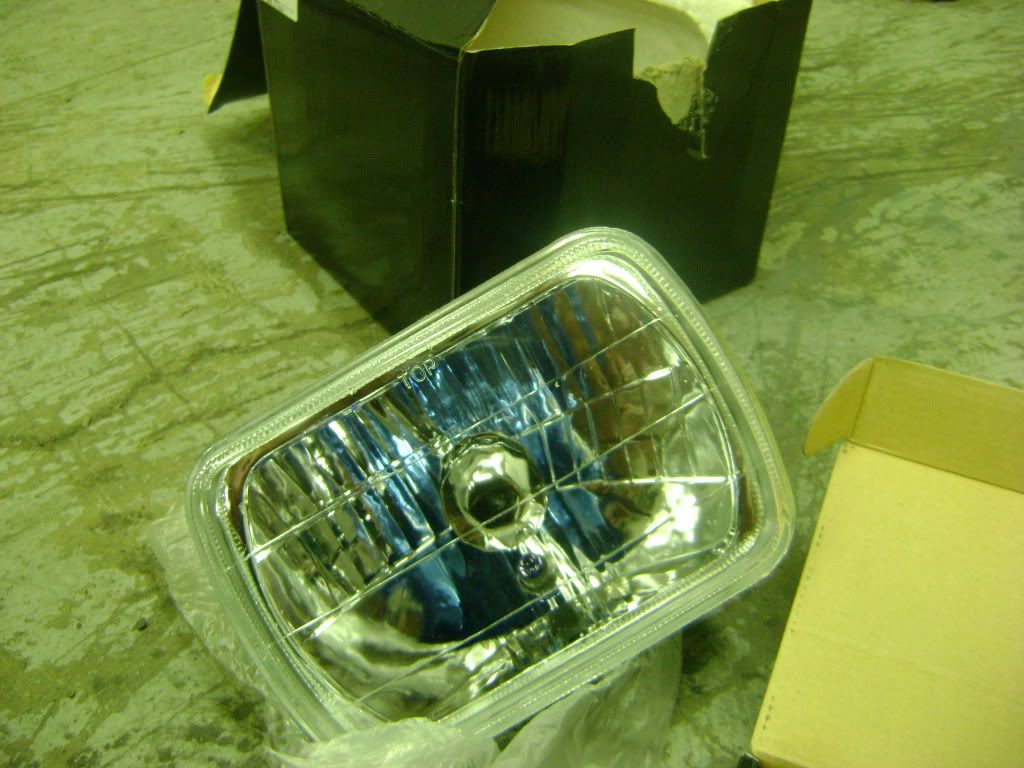
Diamond Clear H4 Headlights
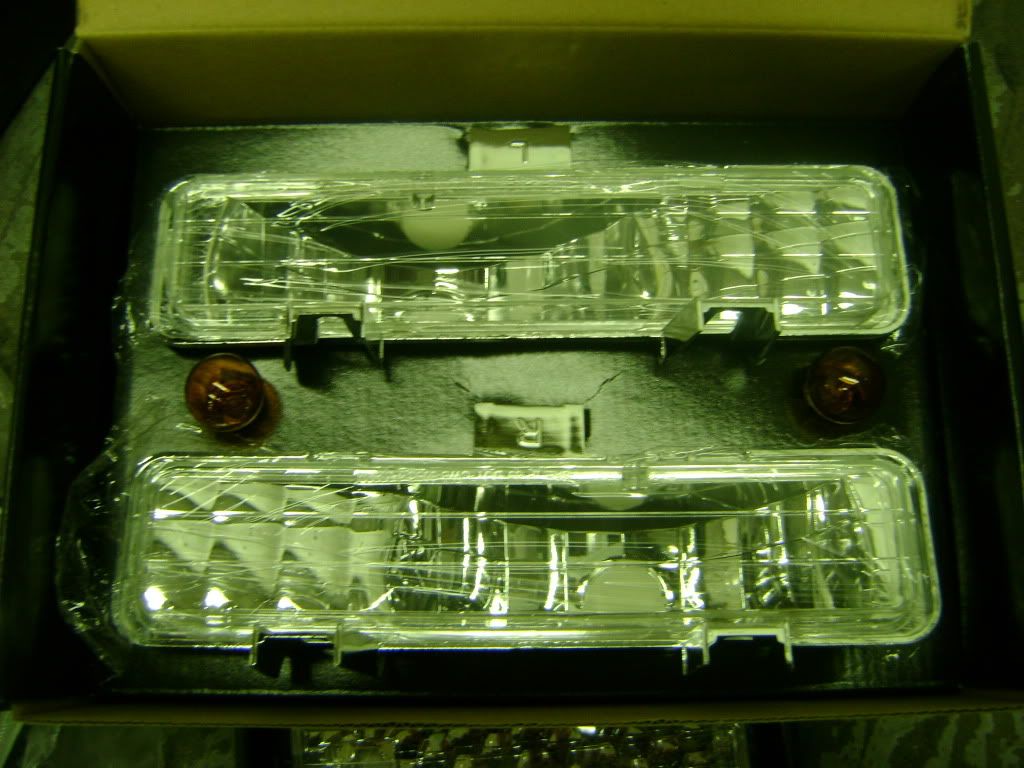
Diamond Corner and Marker lights

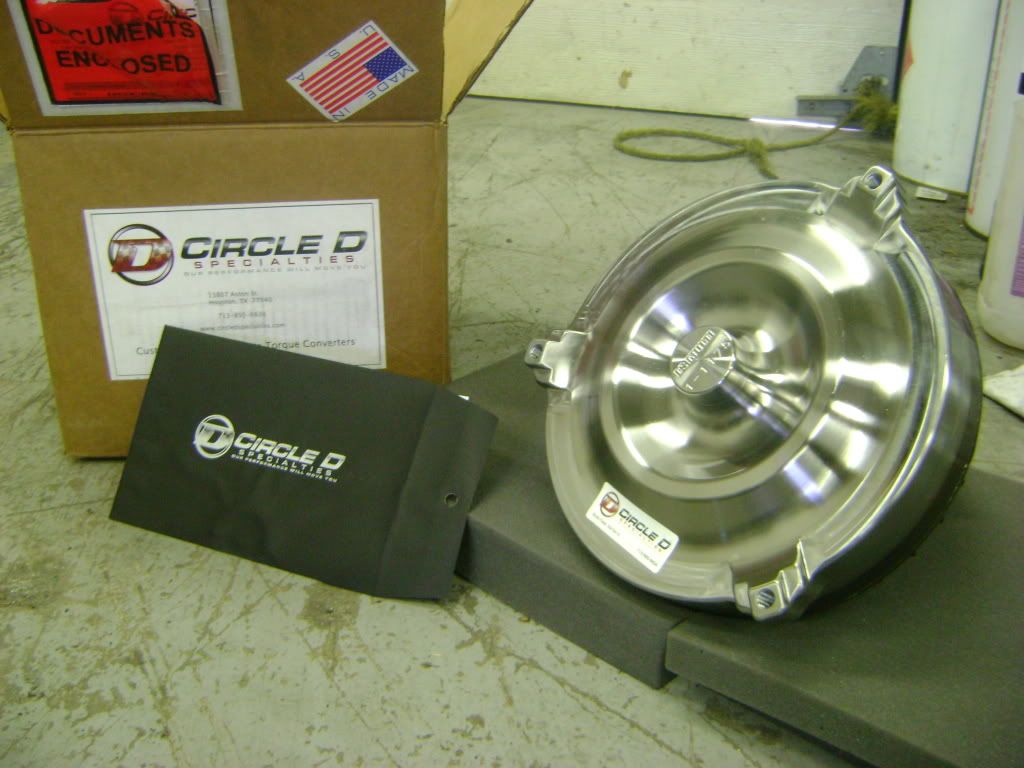
Circle D Specialties - Tripple Disc, full billet 3500 stall, Its simply georgous and very light compared to stock!
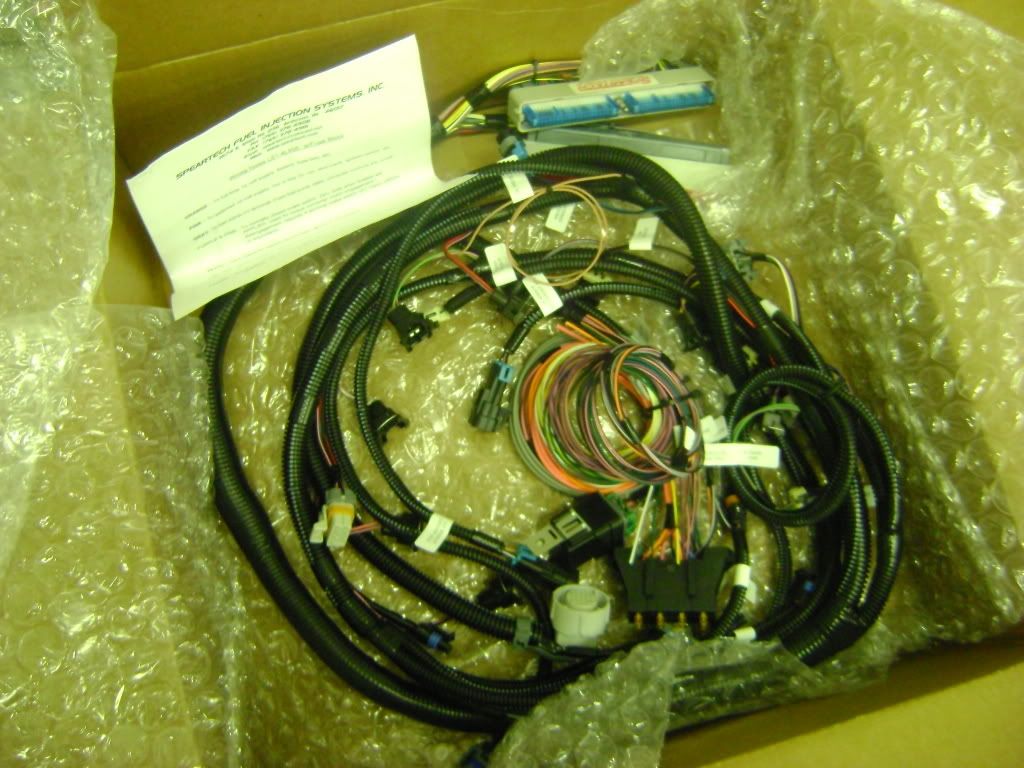
Stand Alone Wiring harness custom made from Speartech Fuel Injection Systems

My new Renz Fab. front brake kit (Thanks Renz!)

Took a break from fitting the cab and finished up my rear coil set up! I had said i wasn't 100% happy with the coils and the way they were mounted. So we changed the upper position of the coils, mounting them on a angle to help adjustability and ride quailty. Also got a great deal on a set of new single adjustable rears that i couldnt pass up so i picked these up because my previous rears had no damping adjustment.
New coils

Final crossmember bar

Painted it and re-installed :tup:


Oh and then we finished setting the cab down on the rolling chassis....
its too bad it cant stay this low


Thats all for now!
Here's another update guys! got some more done in the last few days!
So I got my valve covers and fuel rail sanded
cleaned, taped and set them up in the booth for paint!
Mixed of my paint, (base left, pearl right) named the base peach cobbler haha, its
just what came to mind. and pearl coat 24K
After 2 coats of base
After 3 coats of pearl
And finally 2 coats of clear :lol:
Also got my tabs for my motor mounts, I'll be using a factory GM LS1 mount that bolts to the motor and ill be making a solid type mount that bolts to the frame.
I had been looking for a LS6 intake for the truck but decided I can add that later if need be. In the mean time though the factory LS1 intake had this emission hole in it behind the throttle body, I found out the LS1 C5 corvette intakes didnt have this hole, However otherwise were the same. So I scored one of these locally and picked it up!
Factory Camaro LS1:
New (Factory) Corvette LS1:
And installed!
Then I started to clean the gas tank ect for re-installation. Threw in a Walboro pump to!
Took the hoses off, sending unit out, cleaned it sanded it, primed it and painted it!
Back together!
In between drying time with the gas tank I got busy seperating the factory 700R4 and transfer case as well as seperating the 4L80E and attached transfer case. I made quite the mess!
Installed some of my Prime Gears 4L80E kit since I was working on mocking up everything! Some parts werent installed as everything obviously had to come back apart so I can send the trans to get built!
Got the 4L80E and transfer case together and dropped it in with my 4L80E tubular crossmember.
Then the motor came off the engine stand and made its way in there as well!
My Father trying to put my drivers side headers on, but of course ran into the start of the problems as we knew we would.
So we had to cut this un-used bracket off of the trans.
Got the header on, set the motor where it neede to be and snugged up the mounting points so that we could roll the frame outside and bring the cab inside to put on the hoist to lower it back down on to the frame!
I guess i'll break the news now...the truck is going one of my favorite colors 2005 Subaru STI Aspen White.
Decided to put set my valve covers and fuel rail on since I had picked them up the following sunday after painting them and i wanted to see the pearl in the light!! So on they went....
Rolled the rolling chassis back in after putting the cab back on to the hoist, started lowering it down...
ran in to a few problems with fitment, did quite a bit of moving around and adjusting...still have tons of fitting to do ect but its getting there...
Got a few new parts for the build that came in this week too!! it was like christmas!
Diamond Clear H4 Headlights
Diamond Corner and Marker lights
Circle D Specialties - Tripple Disc, full billet 3500 stall, Its simply georgous and very light compared to stock!
Stand Alone Wiring harness custom made from Speartech Fuel Injection Systems
My new Renz Fab. front brake kit (Thanks Renz!)
Took a break from fitting the cab and finished up my rear coil set up! I had said i wasn't 100% happy with the coils and the way they were mounted. So we changed the upper position of the coils, mounting them on a angle to help adjustability and ride quailty. Also got a great deal on a set of new single adjustable rears that i couldnt pass up so i picked these up because my previous rears had no damping adjustment.
New coils
Final crossmember bar
Painted it and re-installed :tup:
Oh and then we finished setting the cab down on the rolling chassis....
its too bad it cant stay this low
Thats all for now!
Sportmachines
Active member
Re: Sy #2875 Build :eh:
Looking killer Tyler. Making great progress buddy. Keep it up
Looking killer Tyler. Making great progress buddy. Keep it up
Maple Syrup
Canadian Bacon Breath
Re: Sy #2875 Build :eh:
The corner grill lights I have had for about 7 years, to my knowledge they stopped making these sets about 7 years ago, I had bought all the sets I could find back then because they were my favorite also. However these are my last set!
As for the diamond bumper lights I also had heard they were discotinued, but found these on summitracing.com about a month back, they were 54.00 iirc and have them in stock. You may have luck finding the Grill corner lights too, but I never looked. I'll check now.
Thanks Tom, appreciate it! I Just cant wait to drive it!
Holy shit... Tyler, where did you find the diamond corner lenses?! Ive been looking for YEARS for those things so I can have replacements if mine ever got damaged! Ive never been able to find them anywhere.
The corner grill lights I have had for about 7 years, to my knowledge they stopped making these sets about 7 years ago, I had bought all the sets I could find back then because they were my favorite also. However these are my last set!
As for the diamond bumper lights I also had heard they were discotinued, but found these on summitracing.com about a month back, they were 54.00 iirc and have them in stock. You may have luck finding the Grill corner lights too, but I never looked. I'll check now.
Looking killer Tyler. Making great progress buddy. Keep it up
Thanks Tom, appreciate it! I Just cant wait to drive it!