
mattw
Active member
So I'm on a mission to have my 4-door cladding done before NATs. In lieu of trying to cut up and glue together stock cladding I've decided to make open face fiberglass molds of a stock cladding set. I will then be able to make fiberglass reproductions of the parts, cut those up, and re-glass them together to make my 4-door cladding..
I'm also hoping I can start selling parts on the side to help fund this project. I'm finding its very expensive and extremely time consuming to make these molds..
Step 1:
The part you want to copy must be in perfect condition. Any imperfections in the original will be transferred to the mold and then to any parts made in that mold. In most cases this means doing body work and priming these pieces of cladding.
Step 2:
Any negative curves on the part must be flanged or plugged. If you don't do this your original will get stuck in the mold and you will never get it out. Also all edges of the part must be flanged. This helps provide rigidity and also makes it much easier to make clean edges on the parts made in the mold.


Step 3:
All holes must be filled with clay.. This is one of the few steps that actually goes fairly quickly...

Step 4:
You must wax your original part so that it will not get stuck in the mold. You can't wax it just once though.. It needs to be done 8-10 times and you need to wait at least 1 hour between each coat.


Step 5:
Next you have to spray down a PVA(release agent).. This is done in several very light mist coats.


Step 6:
Once your release agent fully dries you can apply your gelcoat. This can be brushed or sprayed. I use a gelcoat cup-gun as you get better results that way. It takes 3-4 coats to get the appropriate thickness. This part is scary.. You feel like you are ruining a perfectly good part.


Step 7:
Cloth.. Once your gelcoat tacks up, but before it completely dries you need to apply your first layer of cloth.. I use a 6oz cloth for this:


Step 8:
That first coat needs to completely set up.. So its a good idea to let it sit overnight. Next I do a layer or slightly heavier cloth.
Step 9:
8-10 layers of MAT.. This is a slow process as you need to ensure that the resin completly saturates the MAT.. You have to dab it in with a brush and use rollers to get all of the bubbles out.. It took me just over an hour per layer.

I think I did about 10 layers..
Step 10:
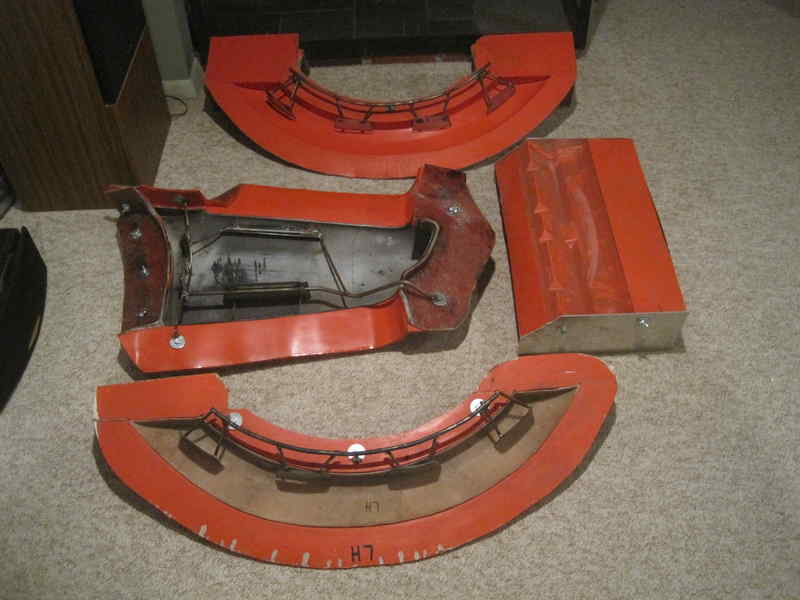
If you are lucky your original part will release without issue.. I got lucky with this one.. This mold will need to be trimmed, wet sanded, waxed, and then it can be used to make a part.

This is the 5th mold that I've made.. I don't need to do the rear bumper or support as I have stock parts to run for that. I think I've got about 8-9 molds left to make yet..
I'm also hoping I can start selling parts on the side to help fund this project. I'm finding its very expensive and extremely time consuming to make these molds..
Step 1:
The part you want to copy must be in perfect condition. Any imperfections in the original will be transferred to the mold and then to any parts made in that mold. In most cases this means doing body work and priming these pieces of cladding.
Step 2:
Any negative curves on the part must be flanged or plugged. If you don't do this your original will get stuck in the mold and you will never get it out. Also all edges of the part must be flanged. This helps provide rigidity and also makes it much easier to make clean edges on the parts made in the mold.
Step 3:
All holes must be filled with clay.. This is one of the few steps that actually goes fairly quickly...
Step 4:
You must wax your original part so that it will not get stuck in the mold. You can't wax it just once though.. It needs to be done 8-10 times and you need to wait at least 1 hour between each coat.
Step 5:
Next you have to spray down a PVA(release agent).. This is done in several very light mist coats.
Step 6:
Once your release agent fully dries you can apply your gelcoat. This can be brushed or sprayed. I use a gelcoat cup-gun as you get better results that way. It takes 3-4 coats to get the appropriate thickness. This part is scary.. You feel like you are ruining a perfectly good part.
Step 7:
Cloth.. Once your gelcoat tacks up, but before it completely dries you need to apply your first layer of cloth.. I use a 6oz cloth for this:
Step 8:
That first coat needs to completely set up.. So its a good idea to let it sit overnight. Next I do a layer or slightly heavier cloth.
Step 9:
8-10 layers of MAT.. This is a slow process as you need to ensure that the resin completly saturates the MAT.. You have to dab it in with a brush and use rollers to get all of the bubbles out.. It took me just over an hour per layer.
I think I did about 10 layers..
Step 10:
If you are lucky your original part will release without issue.. I got lucky with this one.. This mold will need to be trimmed, wet sanded, waxed, and then it can be used to make a part.
This is the 5th mold that I've made.. I don't need to do the rear bumper or support as I have stock parts to run for that. I think I've got about 8-9 molds left to make yet..
Last edited:


")


