Re: Belltech Rear swaybar-UPDATED
Re: Belltech Rear swaybar-UPDATED
Well, I did get the sway bar installed. Here is some pics and some details on the install.
First off, I did take a small test drive since it was nice outside and to make sure everything is in check. So far they work great with the belltech lowering springs. ( no blocks)
Here is a quick overview of the install... Sorry, I should have taken more pics... didn't think about taking pics so I could explain it here.
Click on Pics for larger image
First, you have to install the swaybar to the rear axle. You will have to slightly bend the rear brake line so you can properly fit the brace. When you put the swaybar bushing into the braket, the bushing has to extend 1/8-1/16th past the 'U' braket. I used a belt sander to remove the excess, if you don't you will squish the bushing way too much when you tighten down. Loosely (sp?) bolt the sway bar to the axle. It should look like this

Now, this braket which goes under the fuel tank which I don't really know the purpose other then possibly somewhat protect the tank :squint: Reason for removal is to allow a mounting location on driver side for the swaybar endlink.
Remove 2 nuts and bolts on pass side and 1 bolt on driver side frame.

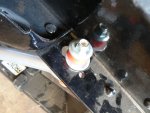
Once you remove the braket, you can use that hole to feed the bolt through for the end link. On the passenger side, there is a elongated hole you can use. Now when you assemble the end link as per belltech intructions, I found that I couldn't put on the nut without a fight, then it would squish the bushings way too much. The endlink bolts that come with it are 4" long. I went out and got a 4.5" grade 8 bolts.

Now once you assemble the endlink, set it up through the swaybar just to make sure the swaybar is properly aligned left to right and front to back without putting the endlink at an extreme angle.. Then go back to the Ubolts that hold the swaybar and tighten them to 32 ft-lbs. Assemble the end links with the longer bolts and tighten till you can still turn the middle bushings and washers with your hand. And it should look like this.

After this is done, you are ready to take a test drive. As of writing this, I haven't fully tested on how it works with the belltech lowering springs. Though on my quick test drive, I heard no funny noises or banging (I don't expect any issues since there was lots of space between the endlink and springs.)
Rob